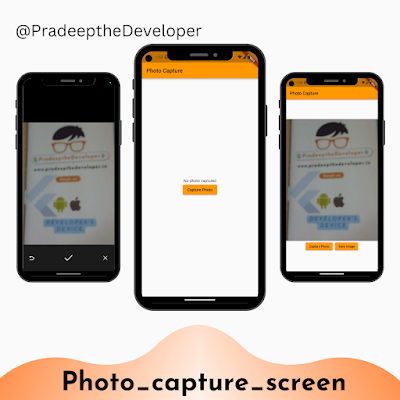
In this blog post, we will explore how to build a photo capture screen in Flutter. We will create a Flutter widget called `PhotoCaptureScreen` that allows users to capture photos using the device's camera and upload them to a backend server. We'll walk through the code step by step to understand how it works.
Code Explanation:
The code provided defines a Flutter widget called `PhotoCaptureScreen`. It extends `StatefulWidget`, which means it can maintain state and update its user interface. Let's dive into the code and understand its various components.
Stateful Widget:
The `PhotoCaptureScreen` widget consists of a single state class called `_PhotoCaptureScreenState`. This class extends `State<PhotoCaptureScreen>`, allowing it to manage the state for the widget.
Image Capture:
The `_capturePhoto` method is responsible for capturing a photo using the device's camera. It uses the `ImagePicker` package to access the camera and retrieve the captured image. If an image is successfully captured, it is stored in the `_image` variable, and the UI is updated using the `setState` method.
Uploading Photo to Backend:
The `_uploadPhotoToBackend` method handles the uploading of the captured photo to a backend server. It first checks if an image is available to upload. If not, it returns early. Otherwise, it creates a `http.MultipartRequest` object and adds the image file to the request using the `http.MultipartFile.fromPath` method. The request is then sent using the `send` method, and the response is checked for success. If the response has a status code of 200, it means the photo was uploaded successfully.
User Interface:
The `build` method defines the user interface for the `PhotoCaptureScreen` widget. It uses a `Scaffold` widget as the main container and adds an `AppBar` with a title. The body of the screen consists of a `Center` widget that contains a `Column` for displaying the captured photo and buttons.
The captured photo is displayed using the `Image.file` widget if `_image` is not null. Otherwise, a text widget is shown with the message ""No photo captured"". The capture and save buttons are placed in a `Row` widget. The capture button calls the `_capturePhoto` method when pressed, and the save button is only shown when an image is available. Pressing the save button calls the `_uploadPhotoToBackend` method.
import 'dart:io';

import 'package:flutter/material.dart';
import 'package:image_picker/image_picker.dart';
import 'package:http/http.dart' as http;

void main() {
  runApp(const MyApp());
}

class MyApp extends StatelessWidget {
  const MyApp({super.key});

  // This widget is the root of your application.
  @override
  Widget build(BuildContext context) {
    return MaterialApp(
      title: 'Flutter Demo',
      theme: ThemeData(
        primarySwatch: Colors.orange,
      ),
      home: PhotoCaptureScreen(),
    );
  }
}

class PhotoCaptureScreen extends StatefulWidget {
  const PhotoCaptureScreen({super.key});

  @override
  // ignore: library_private_types_in_public_api
  _PhotoCaptureScreenState createState() => _PhotoCaptureScreenState();
}

class _PhotoCaptureScreenState extends State<PhotoCaptureScreen> {
  File? _image;

  Future<void> _capturePhoto() async {
    final imagePicker = ImagePicker();
    final pickedImage = await imagePicker.getImage(source: ImageSource.camera);

    if (pickedImage != null) {
      setState(() {
        _image = File(pickedImage.path);
      });

      await _uploadPhotoToBackend();
    }
  }

  Future<void> _uploadPhotoToBackend() async {
    if (_image == null) {
      // No photo to upload
      return;
    }

    const url =
        'https://your-backend-api-endpoint.com/upload'; // Replace with your backend API endpoint
    final request = http.MultipartRequest('POST', Uri.parse(url));
    request.files.add(await http.MultipartFile.fromPath('photo', _image!.path));

    final response = await request.send();

    if (response.statusCode == 200) {
      // Photo successfully uploaded
      debugPrint('Photo uploaded to the backend!');
    } else {
      // Error uploading photo
      debugPrint('Error uploading photo: ${response.statusCode}');
    }
  }

  @override
  Widget build(BuildContext context) {
    return Scaffold(
      appBar: AppBar(
        title: const Text('Photo Capture'),
      ),
      body: Center(
        child: Column(
          mainAxisAlignment: MainAxisAlignment.center,
          children: <Widget>[
            _image != null
                ? Image.file(_image!)
                : const Text('No photo captured'),
            Row(
              mainAxisAlignment: MainAxisAlignment.center,
              children: [
                ElevatedButton(
                  onPressed: _capturePhoto,
                  child: const Text('Capture Photo'),
                ),
                _image == null
                    ? const Text("")
                    : Row(
                        children: [
                          const SizedBox(
                            width: 10,
                          ),
                          ElevatedButton(
                              onPressed: _uploadPhotoToBackend,
                              child: const Text('Save Image')),
                        ],
                      )
              ],
            )
          ],
        ),
      ),
    );
  }
}
In this blog post, we explored how to build a photo capture screen in Flutter. We examined the code for the `PhotoCaptureScreen` widget and learned how to capture photos using the device's camera and upload them to a backend server. Flutter provides powerful tools and libraries that make it easy to create engaging and interactive user interfaces. By understanding the code provided, you can customize and enhance the photo capture screen to fit your specific application requirements.
Remember to import the necessary packages and configure the backend API endpoint before running the code.
Happy coding!

