Optical Character Recognition (OCR) is a technology that enables the conversion of images containing text into editable and searchable data. With OCR, you can extract text from images, making it a powerful tool for various applications such as document scanning, text recognition, and more. In this blog post, we will explore how to implement OCR image recognition in a Flutter application using the Google ML Kit library. We will walk through the code step by step and understand the key components of the application.
Setting up the Flutter Application
To get started, let's set up a Flutter application. Create a new Flutter project and replace the default code in the `lib/main.dart` file with the following code:
// Import required packages and files
import 'dart:developer';
import 'package:flutter/cupertino.dart';
import 'package:flutter/material.dart';
import 'package:image_picker/image_picker.dart';
import 'package:ocr/Screen/recognization_page.dart';
import 'package:ocr/Utils/image_cropper_page.dart';
import 'package:ocr/Utils/image_picker_class.dart';
import 'package:ocr/Widgets/modal_dialog.dart';

void main() {
  runApp(const MyApp());
}

class MyApp extends StatelessWidget {
  const MyApp({Key? key}) : super(key: key);

  @override
  Widget build(BuildContext context) {
    return MaterialApp(
      title: 'OCR Image recognition',
      theme: ThemeData(
        primarySwatch: Colors.orange,
      ),
      home: const MyHomePage(title: 'Optical Character Recognition (OCR)'),
    );
  }
}

class MyHomePage extends StatelessWidget {
  const MyHomePage({Key? key, required this.title}) : super(key: key);

  final String title;

  @override
  Widget build(BuildContext context) {
    return Scaffold(
      appBar: AppBar(
        title: Text(title),
      ),
      body: Center(
        child: Column(
          mainAxisAlignment: MainAxisAlignment.center,
          children: <Widget>[
            ElevatedButton(
              onPressed: () {
                // Show the image picker modal
                imagePickerModal(context, onCameraTap: () {
                  log("Camera");
                  // Use the image picker to capture an image from the camera
                  pickImage(source: ImageSource.camera).then((value) {
                    if (value != '') {
                      // Once an image is captured, show the image cropper view
                      imageCropperView(value, context).then((value) {
                        if (value != '') {
                          // After cropping the image, navigate to the recognition page
                          Navigator.push(
                            context,
                            CupertinoPageRoute(
                              builder: (_) => RecognizePage(
                                path: value,
                              ),
                            ),
                          );
                        }
                      });
                    }
                  });
                }, onGalleryTap: () {
                  log("Gallery");
                  // Use the image picker to select an image from the gallery
                  pickImage(source: ImageSource.gallery).then((value) {
                    if (value != '') {
                      // Once an image is selected, show the image cropper view
                      imageCropperView(value, context).then((value) {
                        if (value != '') {
                          // After cropping the image, navigate to the recognition page
                          Navigator.push(
                            context,
                            CupertinoPageRoute(
                              builder: (_) => RecognizePage(
                                path: value,
                              ),
                            ),
                          );
                        }
                      });
                    }
                  });
                });
              },
              child: Text("Scan photo"),
            )
          ],
        ),
      ),
    );
  }
}
Let's understand the structure of the code:
- The `main.dart` file is the entry point of the Flutter application. It defines a `MyApp` widget that serves as the root of the application.
- The `MyApp` widget is a stateless widget and returns a `MaterialApp` widget as the root of the widget tree. It sets the title and theme of the application and defines the home screen as an instance of the `MyHomePage` widget.
- The `MyHomePage` widget is also a stateless widget and represents the home screen of the application. It contains a single `ElevatedButton` widget that triggers the image recognition process when pressed.
- When the button is pressed, the `imagePickerModal` function is called to show a modal bottom sheet with options to capture an image from the camera or select an image from the gallery.
- Depending on the chosen option, the `pickImage` function is called to capture or select an image using the `ImagePicker` package.
- After capturing or selecting an image, the `imageCropperView` function is called to show a cropping view using the `image_cropper` package. The user can crop the image to focus on the relevant text.
- Once the image is cropped, the `RecognizePage` widget is pushed onto the navigation stack using `Navigator.push`. The `path` of the cropped image is passed to the `RecognizePage` widget for further processing.
Implementing the Image Picker Modal
Next, let's explore the code for the image picker modal. Create a new file named `modal_dialog.dart` and add the following code:
import 'package:flutter/material.dart';

void imagePickerModal(BuildContext context,
    {VoidCallback? onCameraTap, VoidCallback? onGalleryTap}) {
  showModalBottomSheet(
      context: context,
      builder: (context) {
        return Container(
          padding: const EdgeInsets.all(20),
          height: 220,
          child: Column(
            children: [
              GestureDetector(
                onTap: onCameraTap,
                child: Card(
                  child: Container(
                    alignment: Alignment.center,
                    padding: const EdgeInsets.all(15),
                    decoration: const BoxDecoration(color: Colors.grey),
                    child: const Text("Camera",
                        style: TextStyle(
                            fontWeight: FontWeight.bold, fontSize: 20)),
                  ),
                ),
              ),
              const SizedBox(height: 10),
              GestureDetector(
                onTap: onGalleryTap,
                child: Card(
                  child: Container(
                    alignment: Alignment.center,
                    padding: const EdgeInsets.all(15),
                    decoration: const BoxDecoration(color: Colors.grey),
                    child: const Text("Gallery",
                        style: TextStyle(
                            fontWeight: FontWeight.bold, fontSize: 20)),
                  ),
                ),
              ),
            ],
          ),
        );
      });
}
This code defines the `imagePickerModal` function, which takes `BuildContext` and optional `VoidCallback` functions for camera and gallery taps as parameters. The function shows a modal bottom sheet with two options: "Camera" and "Gallery". The user can tap on either option to trigger the respective callback function.
Implementing the Image Picker
Now let's take a look at the code for capturing or selecting an image using the `ImagePicker` package. Create a new file named `image_picker_class.dart` and add the following code:
import 'dart:developer';
import 'package:image_picker/image_picker.dart';

Future<String> pickImage({ImageSource? source}) async {
  final picker = ImagePicker();

  String path = '';

  try {
    final getImage = await picker.pickImage(source: source!);

    if (getImage != null) {
      path = getImage.path;
    } else {
      path = '';
    }
  } catch (e) {
    log(e.toString());
  }

  return path;
}
The `pickImage` function is an asynchronous function that takes an optional `ImageSource` parameter to specify the source of the image (camera or gallery). It uses the `ImagePicker` package to capture or select an image and returns the path of the selected image as a `String`. If an error occurs during the image picking process, it is logged using `dart:developer`.
Implementing the Image Cropper
Next, let's explore the code for the image cropper functionality using the `image_cropper` package. Create a new file named `image_cropper_page.dart` and add the following code:
import 'dart:developer';
import 'package:flutter/cupertino.dart';
import 'package:flutter/material.dart';
import 'package:image_cropper/image_cropper.dart';

Future<String> imageCropperView(String? path, BuildContext context) async {
  CroppedFile? croppedFile = await ImageCropper().cropImage(
    sourcePath: path!,
    aspectRatioPresets: [
      CropAspectRatioPreset.square,
      CropAspectRatioPreset.ratio3x2,
      CropAspectRatioPreset.original,
      CropAspectRatioPreset.ratio4x3,
      CropAspectRatioPreset.ratio16x9
    ],
    uiSettings: [
      AndroidUiSettings(
          toolbarTitle: 'Crop Image',
          toolbarColor: Colors.orange,
          toolbarWidgetColor: Colors.white,
          initAspectRatio: CropAspectRatioPreset.original,
          lockAspectRatio: false),
      IOSUiSettings(
        title: 'Crop Image',
      ),
      WebUiSettings(
        context: context,
      ),
    ],
  );

  if (croppedFile != null) {
    log("Image cropped");
    return croppedFile.path;
  } else {
    log("Do nothing");
    return '';
  }
}
The `imageCropperView` function is an asynchronous function that takes the `path` of the selected image and the `BuildContext` as parameters. It uses the `ImageCropper` class from the `image_cropper` package to open a cropping view for the selected image. The function allows the user to crop the image using various aspect ratio presets and UI settings. Once the image is cropped, the function returns the path of the cropped image as a `String`. If no cropping is performed or an error occurs, appropriate log messages are displayed.
Implementing the OCR Recognition Page
Finally, let's explore the code for the OCR recognition page. Create a new file named `recognization_page.dart` and add the following code:
import 'dart:developer';
import 'package:flutter/material.dart';
import 'package:google_mlkit_text_recognition/google_mlkit_text_recognition.dart';
import 'package:image_picker/image_picker.dart';
import '../utils/image_cropper_page.dart';
import '../utils/image_picker_class.dart';
import '../widgets/modal_dialog.dart';

class RecognizePage extends StatefulWidget {
  final String? path;
  const RecognizePage({Key? key, this.path}) : super(key: key);

  @override
  State<RecognizePage> createState() => _RecognizePageState();
}

class _RecognizePageState extends State<RecognizePage> {
  bool _isBusy = false;

  TextEditingController controller = TextEditingController();
  late InputImage inputImage; // Declare inputImage as a class-level variable

  @override
  void initState() {
    super.initState();

    inputImage = InputImage.fromFilePath(widget.path!);
    processImageText(inputImage);
  }

  @override
  Widget build(BuildContext context) {
    return Scaffold(
        appBar: AppBar(title: const Text("recognized page")),
        body: _isBusy == true
            ? const Center(
                child: CircularProgressIndicator(),
              )
            : Column(children: [
                Container(
                  padding: const EdgeInsets.all(10),
                  child: TextField(
                    controller: controller,
                    maxLines: null,
                    readOnly: true,
                    decoration: InputDecoration(
                        labelText: "Recognized Text",
                        border: OutlineInputBorder()),
                  ),
                ),
              ]));
  }

  Future<void> processImageText(InputImage inputImage) async {
    final textDetector = GoogleMlKit.vision.textDetector();
    setState(() {
      _isBusy = true;
    });

    try {
      final RecognisedText recognizedText = await textDetector.processImage(inputImage);

      String recognizedTextString = '';

      for (TextBlock block in recognizedText.blocks) {
        for (TextLine line in block.lines) {
          for (TextElement element in line.elements) {
            recognizedTextString += element.text + ' ';
          }
        }
      }

      setState(() {
        controller.text = recognizedTextString;
        _isBusy = false;
      });
    } catch (e) {
      log(e.toString());
      setState(() {
        _isBusy = false;
      });
    } finally {
      textDetector.close();
    }
  }
}
The `RecognizePage` widget is a stateful widget that represents the OCR recognition page. It takes the `path` of the cropped image as a parameter. In the `initState` method, the `inputImage` is initialized with the `path` and the `processImageText` function is called to initiate the text recognition process using the Google ML Kit library.
In the `build` method, a `TextField` widget is used to display the recognized text. The `controller` is set as read-only to prevent user input.
The `processImageText` function is an asynchronous function that takes an `InputImage` as a parameter. It uses the `GoogleMlKit` package to create a text detector instance and process the input image. The recognized text is extracted from the `RecognisedText` object and displayed in the `TextField`. If an error occurs during the text recognition process, it is logged using `dart:developer`. Finally, the text detector is closed to release resources.
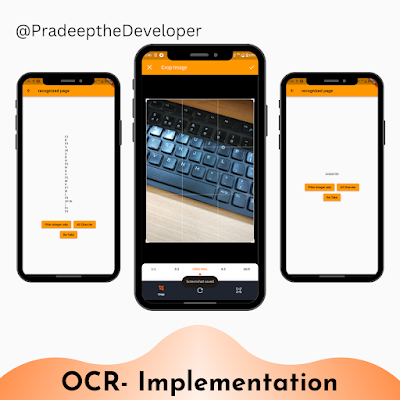
In this blog post, we explored how to implement OCR image recognition in a Flutter application using the Google ML Kit library. We covered the setup of the Flutter application, implementing the image picker modal, capturing or selecting an image, cropping the image using the image cropper, and performing OCR text recognition using the Google ML Kit library. By following the steps and understanding the code, you can integrate OCR functionality into your Flutter applications and extract text from images with ease.
Tags:
Flutter
